Preparation of Thin Sections
Thin sections are often the best form of preparation for otolith annuli. They may also be appropriate for examination of daily increments in large otoliths. Transverse sections through the core are the norm. Here we describe a good method for embedding and sectioning otoliths more than 3 mm in length, suitable for careful preparation of individual otoliths with an Isomet saw. Mass production techniques are described on a separate page.
Embedding
We have prepared a 10-minute VIDEO DEMONSTRATION of epoxy embedding methods for otoliths, which provides an easy and complete overview of the process in preparation for thin sectioning with an Isomet saw. The information below also describes the steps and materials used in embedding, but provides more detail on some of the materials and suppliers than does the video.
It is possible to section very large otoliths (>2 cm in length) with an Isomet saw with no prior embedding. It is also possible to embed large otoliths (>1 cm in length) in molten wax prior to sectioning. However for precise sectioning with an Isomet saw, it is best to embed the otolith in a hard epoxy. We use Araldite epoxy GY502 and hardener HY956 in a 5:1 weight ratio (available from Brenntag Canada Inc.). We also use Buehler Epo Thin resin (catalog # 20-8140-032) and Buehler Epo Thin hardener (catalog # 20-8142-016) (Buehler catalog) in a 5:2 weight ratio. However, other epoxies and setting compounds, as long as they are transparent and very hard, will work.
To prepare the epoxy, add the epoxy and hardener together in a paper cup on a tared top-loading balance. Do not use a plastic cup. 20 g Araldite epoxy and 4 g hardener will stay soft for 45-60 mins, which is enough time to embed about 20 otoliths. Stir for a minimum of 3-4 mins, then sonify in the cup to remove bubbles for 5 mins or until clear (some froth will stay on top). If there are only a few otoliths to embed, let the epoxy sit for 5-15 mins to set a little.
Free Pour Procedure:
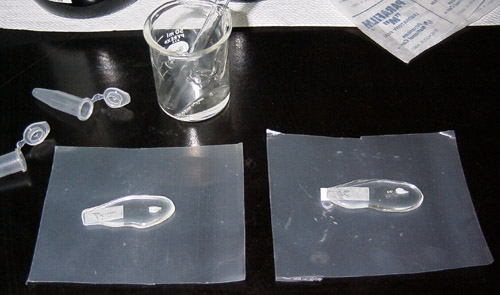
Pour a few mls of epoxy into a pear shape (~ 2 cm long and 1-2 cm wide) on a sheet of Parafilm; label a small piece of paper and stick the label into the narrow end of the epoxy pool. Prepare a separate preparatory pool of epoxy to be used for all otoliths. Push the otolith into the preparatory pool of epoxy, sulcus side up; use a fine probe to remove all bubbles from around the otolith, particularly in and around the sulcus. Use forceps to lift the otolith out of the preparatory epoxy and put it sulcus side down into the embedding pool of epoxy, with the long axis of the otolith parallel to the long axis of the epoxy pool. Push the otolith to the bottom, making sure there are no bubbles.
Let the epoxy solidify overnight, then wipe the bottom of the epoxy with 95% ethanol. Pour a few mls of freshly mixed epoxy over the bottom to encase the otolith on both sides. Allow to set 3 days before sectioning. Use 95% ethanol to remove spilled liquid epoxy.
Mold Procedure:
We use 12-well silicone EPDM (silcone combined with a synthetic rubber) molds, 19 x 11 cm. Individual wells are 4 x 2 x 0.5 cm and hold up to 4 ml of epoxy. Prepare molds by applying, with a small brush to each well, a light coat of release agent such as Frekote (Henkel/Loctite) and allow to dry. It is best to apply the release agent immediately following the last use of the mold.
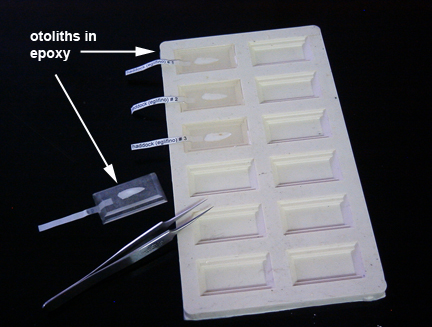
Prepare labels and coat otolith with epoxy as in the free pour procedure. Allow to solidify overnight before removing the embedded otolith. Do not wipe with ethanol. There is usually no need to coat the otolith with additional epoxy to encase. Cure 3 days prior to sectioning.
Sectioning
We have prepared a 10-minute VIDEO DEMONSTRATION of sectioning methods for otoliths and shark vertebrae, which provides an easy and complete overview of the process. The information below also describes the steps and materials used in sectioning, but provides more detail on some of the materials and suppliers than does the video.
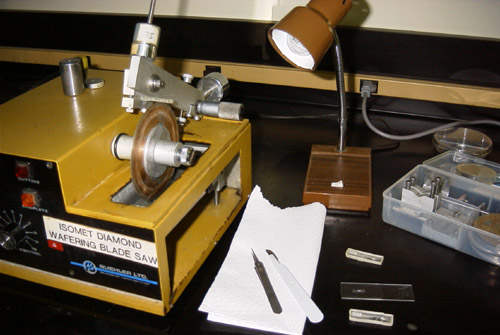
We use an Isomet low-speed diamond bladed saw for preparing otolith sections, but any equivalent saw can be used. By fitting the saw with two blades separated by a spacer, a thin section be prepared from an epoxy-embedded otolith with a single cut in about 2 minutes.
The epoxy-embedded otolith is clamped perpendicular to the saw blade with a V-notch clamp, whereby the otolith is positioned on the lower surface of the epoxy block.
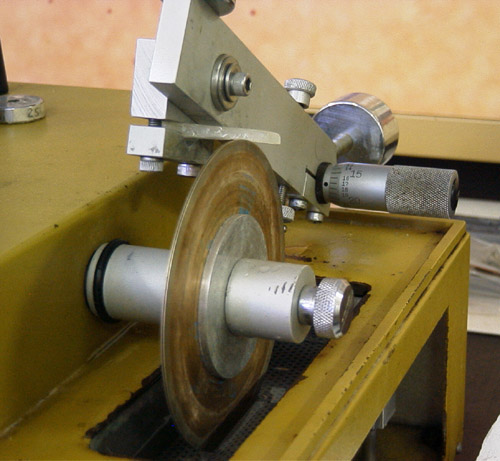
The epoxy-embedded otolith is clamped perpendicular to the saw blade with a V-notch clamp, whereby the otolith is positioned on the lower surface of the epoxy block. The water tray for the saw is filled with 60% glycerin in water to a level where it just touches the tip of the blade. We use 4" blades between 3" flanges; with only 0.5" of free blade exposed, blade wobble is minimized. Where two blades are to be used, we separate them by a thin metal or plastic spacer with a diameter of 3" and a thickness appropriate to the section being prepared. Typically, a 500 µm spacer will be used, producing a 400-500 µm otolith thin section.
The saw can be run relatively quickly (which is still slow) with 100 g of weight on top until the blade is almost through the epoxy. Stop the saw immediately after 1 side of the epoxy block falls off. Remove the block from the clamp and use fingers or forceps to break off the section (which is probably attached to the block by very little). Rinse the thin section in 95% ethanol, then use a scalpel to cut off the broken block attachment point.
Polish one side of the section with 30 µm dry lapping film mounted on a smooth surface (eg- glass plate), then 3 µm lapping film, using a finger. The polish can be brief, and should be to remove coarse scratches only. In many cases, polishing is not necessary. The section can then be mounted onto a microscope slide with a mounting medium. We often use a cyanocrylate glue (Krazy Glue) or thermal-setting plastic (Crystalbond). However, a more durable bond can be made with epoxy. To do this, use an approach similar to that of making a blood smear. Use a microscope slide to spread a layer of epoxy on one half of the mounting slide, making the epoxy layer no thicker than the section (eg- 400 µm thick). Slide the section into the epoxy making sure that there are no bubbles underneath and no epoxy on top of the section. Press the section down onto the slide and allow to dry 2-3 days. Polish the top of the section if required.