Otolith Microstructure Preparation
The preparation of otoliths for microstructural examination takes practice. Initial attempts can be frustrating, but consistently good results are possible after days or weeks of practice, depending on the size of the otolith and the clarity of the microstructure. Here I present my favourite method, which is also one of the fastest. The method involves mounting the otolith on a microscope slide with either thermoplastic cement or cyanoacrylate glue, then polishing from one or both sides to a thin section. The method is ideal for most larval and juvenile otoliths; for adult otoliths, it is often preferable to prepare a thin section first, then to polish. Alternatively, the preparation of epoxy-embedded thin sections for microstructural examination is presented in the web version of David Secor's 1991 Manual for Otolith Removal and Preparation for Microstructual Examination. Secor's method is time consuming, but produces good quality results with larger otoliths.
Mounting the Otolith
For most otoliths greater than 50-100 µm in diameter, polishing will be required to fully reveal the narrow growth increments encircling the core. If this is the case, the otolith will need to be mounted so that the plane of the growth increments is parallel to the microscope slide. Otherwise, the polishing which comes later will be complicated. For some otoliths, this means that the sulcus side should face up on the slide so that the otolith lies flat. However, as long as the otolith lies flat, the side left up really doesn't matter. In some cases, it is preferable to leave the side facing up which has the most otolith material between the core and the surface, so that this excess material can be removed with polishing.
Cyanoacrylate glue (Krazy Glue or Super Glue) does an excellent job of holding the otolith to the slide, and at the same time, partially clearing the otolith. It is easy and quick to apply. It can also be flipped over after polishing (this is described later). However, I have noticed that it tends to peel off the slide after a year or more of storage, especially after exposure to immersion oil. For most studies, this is not a problem, since the otolith examination will have been competed early on. If archival properties are important however, Krazy Glue should not be used.
To mount the otolith in Krazy Glue, the otolith is placed near the centre of the microscope slide, and the slide placed on the stage of a dissecting microscope at low magnification. Only one otolith should be mounted per slide. Ensure that the otolith is lying flat. Place one drop of Krazy Glue beside the otolith, close to but not touching it. If the glue applicator touches the otolith, the otolith will likely stick to it! While looking at the glue drop and otolith through the microscope, put the end of a probe into the glue drop at an oblique angle and draw the glue around, then over, the otolith. Surface tension will allow the glue to move with the probe (as long as the probe is held at about a 30 degree angle from the slide) without the probe touching the slide. It is best that the probe not touch the otolith (so that the otolith doesn't stick to the probe). It is even more important that some of the glue be drawn over top of the otolith so that the glue has wetted the entire otolith. Once the otolith is covered, excess glue can be drawn to other parts of the slide. However, there is some advantage to leaving the otolith in a small dome of glue, with the top of the dome being the glue-wetted top of the otolith. Leave the glue and otolith undisturbed while drying. Drying can take anywhere from 15 mins to 2 hours, depending on conditions. A probe tip poked into dry glue will leave an obvious mark, but will not be liquid.

To mount the otolith in Krazy Glue, put a drop of glue beside, but not touching the otolith, in the centre of a microscope slide.
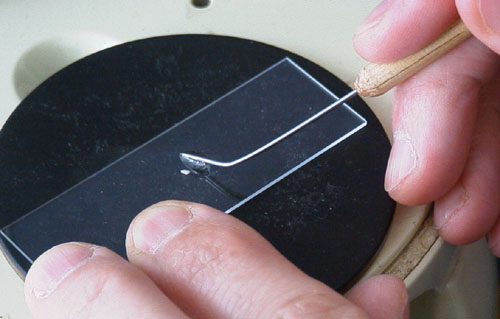
While looking through the microscope, use the end of a curved probe to draw the glue around and over the otolith, without touching the otolith. It's important that the entire surface of the otolith be wetted by the glue.
An alternative to using Krazy Glue for mounting is the use of thermoplastic cement (Crystalbond 509). Crystalbond does a good job of bonding the otolith to the slide, and can be heated to remove or flip an otolith. However, I find it a little messier during the polishing stage. For large otoliths, it's the best choice. However, for small otoliths or for thin sections that need to be flipped, it's awkward to use.
To mount with Crystalbond, the microscope slide needs to be heated to about 275 deg C on a hot plate. A light touch of Crystalbond to the hot slide will leave a gummy liquid residue, into which the otolith is placed. The orientation of the otolith needs to be adjusted while the slide is still hot. Note that it is not necessary to cover the otolith with the glue, as was the case with the Krazy Glue; Crystalbond is used merely to hold the bottom of the otolith onto the slide. The Crystalbond sets quickly after removal from the hot plate. To move or remove the otolith from the slide, simply reheat the slide until the Crystalbond has liquified.
Flipping an Otolith Mounted in Krazy Glue
It is relatively easy to flip an otolith mounted in Krazy Glue, if it is necessary to polish both sides to prepare a thin section. The resulting section is usually of excellent quality, and is thin enough to allow good light transmission and thus clear examination of the daily increment sequence.
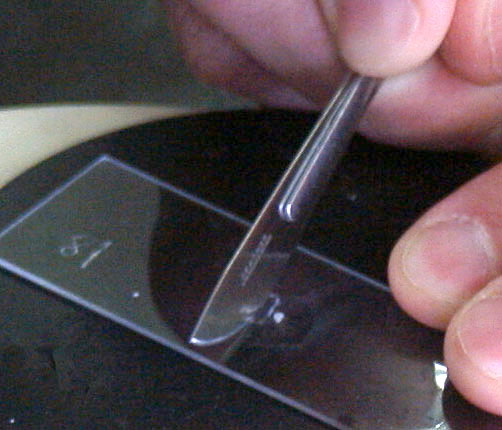
Once the polishing of the first side of the otolith is completed (stopping a little short of the plane of the increments), soak the microscope slide (holding the otolith) in water for about 10 mins. Remove the slide from the water and place it on the stage of a dissecting microscope under reflected light. The bottom of the slide can be quickly dried on a paper towel first, but not the upper surface holding the otolith, which needs to remain wet. Use a scalpel to cut a square in the glue containing the otolith, with the otolith in the centre. Leave approximately one otolith diameter of glue on each side of the otolith. Cut with the scalpel in a rocking motion. As you observe the cut through the microscope, you'll see the glue begin to lift off the slide as the scalpel cuts in its rocking motion. Usually, the square of glue containing the otolith will peel off the slide entirely in the last cut (the 4th side). If it doesn't however, do not use the scalpel to try and cut under the otolith - this will almost always break the otolith. Instead, repeat the 4 scalpel cuts a little bit closer to the otolith. If the otolith and glue have still not peeled off the slide, try soaking the slide in water for another 10 mins and repeating the procedure.
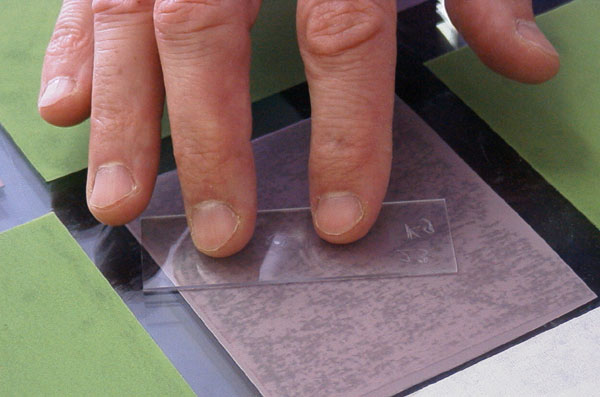
Once the square of glue containing the otolith has peeled off the slide, use a probe to push the square off to the edge of the slide, letting it hang halfway off the slide to speed up drying. The glue remaining on the original gluing site on the slide can be sloughed off with the fingers, then dried with a tissue, so that the same slide can be used for re-gluing the flipped-over otolith. Allow the slide and glue to dry for 5-10 mins under the microscope light. When dry, use forceps to flip over the glue square and dry for another 5 mins. At this point, the square can be moved back into the centre of the slide in preparation for re-gluing.
Re-gluing the flipped otolith is a simpler variation of the original gluing procedure. Place one drop of Krazy Glue immediately beside, but not touching, the glue square containing the otolith. Use a probe to draw the glue around the square on all sides; surface tension will draw the glue under the otolith. Do not draw glue over top of the square, since it will have to be polished off later anyways. Once the glue has dried (~ 1 hr), the preparation can be polished to the plane just short of the increment sequence.
The advantage of this procedure is that the square of glue containing the otolith keeps the otolith rigid; thus the flipped otolith lies exactly opposite to the original polishing plane, making it much easier to prepare a uniform thin section. This is not the case with thermoplastic cement, where the otolith can be flipped after re-heating the cement, but it can be difficult to align the flipped otolith flat on the slide.
Polishing
Most otoliths greater than 50-100 µm in diameter will need to be polished to remove otolith overburden and fully reveal any narrow growth increments encircling the core. It is a common misconception that if daily increments are clearly visible somewhere in the otolith, polishing is not necessary. However, since the central region of the otolith is the thickest and thus the most likely to obscure any increments near the core, clear increments elsewhere in the otolith are not necessarily an indication of a completely visible growth sequence. Only a comparison of the increments visible before and after polishing will provide an indication of whether or not polishing is required for otoliths from a given species and size.
To polish an otolith mounted on a microscope slide with Krazy Glue or thermoplastic cement, we attach adhesive-backed metallurgical lapping film (Imperial Lapping Film by 3M) to a scratch-free glass plate or other very smooth surface. Surface smoothness is important, since nicks or cracks can chip the otolith during polishing. For many otoliths, two grades of lapping film mounted side by side will suffice: 30µm and 3µm. Note that this type of lapping film is dry, and thus is easier to use than are wet lapping films.
To polish the otolith, the slide is inverted on the lapping film. Using the least possible pressure (to avoid fracturing the otolith), the otolith is centred between the index and middle fingers. These two fingers are used to move the slide in a rapid circular motion on the lapping film. Polishing time varies with the grit size of the lapping film, the thickness of the otolith, and the amount of glue covering the otolith.
However, it is often best to begin with only a few seconds of polishing with a fine grit lapping film, checking the level of the polish under the microscope to determine how much material has been removed. Aggressive initial polishing is not recommended until the polisher has some familiarity with the speed at which polishing progresses; it is possible to overpolish (and ruin) an otolith in the first 10 seconds! Once the initial assessment has been completed, the otolith can be polished for 0-10 seconds on the 30µm lapping film, followed by 2-10 seconds on the 3µm film to smooth out the surface for microscopic examination. Small otoliths will only be polished with the 3µm film. A quick rub of the finger over the otolith will remove surface debris before assessing the state of polishing under a compound microscope. The polishing is repeated and the otolith re-examined under the microscope, until the polishing plane is slightly above the plane of the growth increments. At this point, the otolith is ready for interpretation, counting or measurement. If the otolith is particularly large, the otolith might have to be flipped over in order to polish it from the other side as well (termed 'double polishing', which essentially prepares a thin section). If double polishing will be required, polishing of the first side should be stopped slightly above the plane described above; for various reasons, growth increments often become less clear if too much overlying material is removed. The otolith can then be flipped (see previous section) and polished from the other side.
The key step in otolith polishing is checking where the polishing plane is in relation to the plane of the growth increments (this process is shown in the paired images at the bottom of this page). Initially, this must be done under a compound microscope at low magnification (eg- about 100x for all but the largest otoliths). To start, the polishing surface of the glue is brought to focus under the microscope. This surface is readily determined by looking for surface scratches and pieces of debris. A 1-sec polish on 3µm lapping film helps make the surface clear on previously-unpolished otoliths. At later stages of polishing, the polishing surface will be within the otolith itself; initially however, it will be the surface of the glue. Once the polishing surface is located, the microscope is re-focused on the plane of the growth increments or primordia. This plane has been located when the increments or primordia are in the best possible focus. Of course, the visibility of this plane will be poor (or sometimes nonexistent) at an early stage of polishing, when there remains a considerable overburden of glue and otolith material between the surface and the increment plane. This by itself indicates that considerably more polishing is required. In general, the amount of re-focusing required to move between the polishing plane and the incremental plane indicates how much more polishing is required.
As the polishing- microscopic examination cycle proceeds, the distance between the polishing surface and the incremental plane becomes smaller and smaller. Eventually, increments will become visible while the microscope is focused on the surface. When this happens, it indicates that the polishing is nearly completed. It is also a time when the magnification can be increased to about 400x, so that finer control of the polishing can be achieved. Only fine-grit lapping film (3µm) should be used at this point. Polishing can usually be stopped when increments are visible while focused on the polishing plane while at a magnification of 400x. In other words, polishing does not proceed right to the incremental plane, but stops short of it. Note that this examination should be made in the area of the otolith where the increments will eventually be counted.
The objective of the polishing procedure is to make the growth sequence clearly visible along a particular axis between core and edge. Since most otoliths are not completely planar, the optimal polish along one growth axis may well leave other growth axes underpolished, or grossly overpolished. This is not a concern as long as the growth axis selected provides a complete growth sequence.
The time required to completely polish an otolith from one side varies with the size of the otolith and the skill of the polisher. Typically though, an experienced polisher can polish a 100-µm otolith in 1-5 minutes.
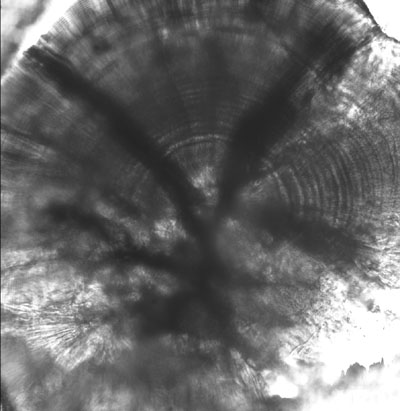
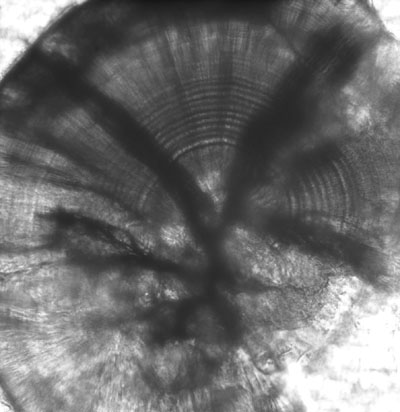
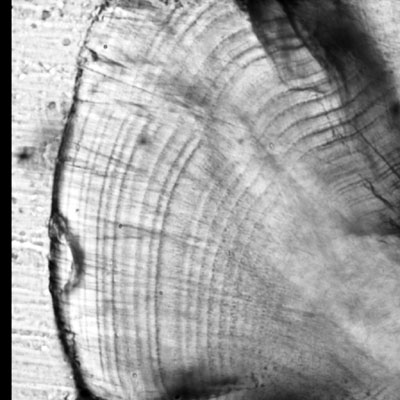
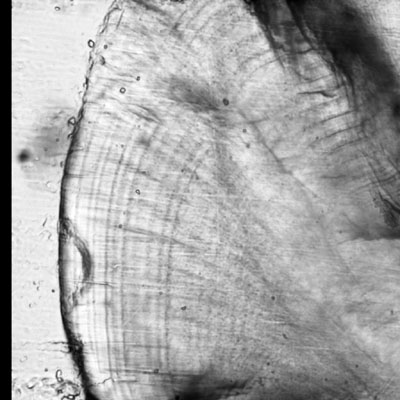
The following image pairs show a trout sagitta glued to a slide as it moves through the polishing process. The key to monitoring polishing progress is focusing first on the grinding surface (top images), then on the incremental plane (bottom images).
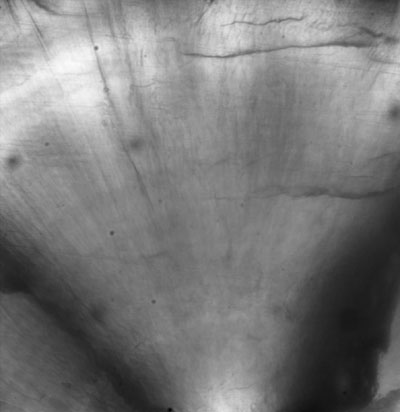
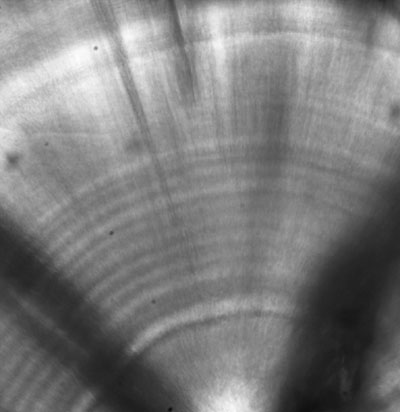
Pair #1
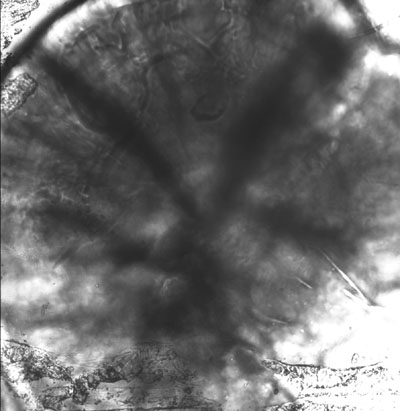
Pair #1a: Unpolished sagitta, with microscope focus set at surface. Debris and scratches at lower part of image indicate that the focus is set at the grinding surface. Magnification is 160x.
Pair #1b: Same unpolished sagitta, focused at plane of increments. Note that only some increments (around the core and to the right) are visible.
Pair #2

Pair #2a: Same otolith as previous, but after some polishing. The fact that some increments are visible when focused on the grinding surface indicates that polishing is nearly finished, and that the microscope magnification needs to be increased to better monitor polishing progress. Microscope focus set at surface.
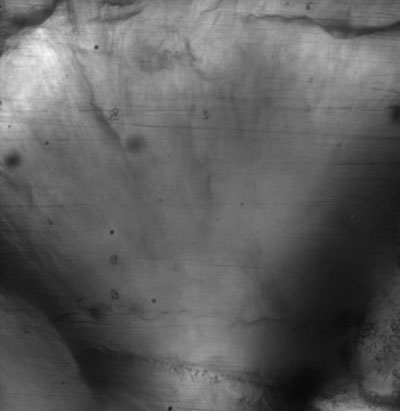
Pair #3a: Same stage of polishing as previous, but with magnification increased to 400x. Microscope focus set at surface.
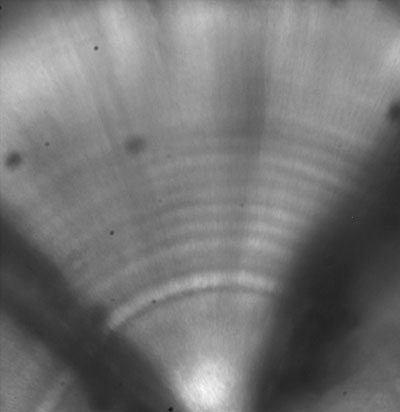
Pair #3b: Same as above image, but focused at plane of increments.
Pair #4
Pair #4a: Polishing has progressed enough that hints of increments are visible when focused on the grinding surface. Polishing must proceed very carefully from now on. Microscope focus set at surface.
Pair #4b: Same as above image, but focused at plane of increments.
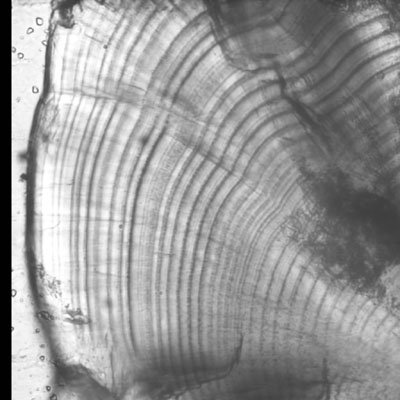
Pair #5

Pair #5a: Polishing is complete, and perhaps has proceeded too far. Although increments should be visible when focused on the grinding surface, they should not be as visible as when focused on the incremental plane. Microscope focus set at surface.

Pair #5b: Same as above image, but focused at plane of increments.

Completely polished otolith at 630x under oil immersion. Although lower magnification may be warranted for otoliths with broad growth increments, use of oil immersion tends to smooth out surface imperfections and improve clarity.
How can you tell if you've polished the correct amount? A correctly polished otolith will be polished to a plane just above that of the growth increments. Many of the growth increments will be visible while focused on the grinding surface, but they should not be as clear as when focused on the increments themselves.
How can you tell if you've overpolished? Polishing beyond the plane of the increments, even slightly, usually makes the increments completely disappear. If increments in a particular area of the otolith have been visible throughout polishing, but cease to be visible in later stages of polishing, it's a safe bet that they've been overpolished. This may happen if the incremental plane is not quite parallel to the plane of the slide, making some areas disappear due to overpolishing before other areas are ready. As mentioned before, this is not a problem as long as one complete growth sequence is visible somewhere else.
Perhaps counterintuitively, an otolith polished right to the incremental plane is more difficult to interpret than is one where some otolith overburden is left unpolished. Subdaily increments and increment splitting tends to be most prominent in a growth sequence polished right to the increment plane.
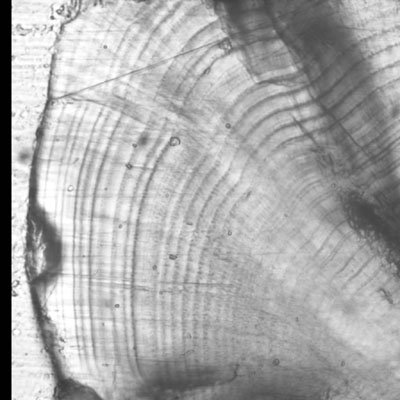
A properly polished otolith. Daily increments are prominent and appear to have some depth as the microscope focus is moved. Subdaily increments are apparent, but easily distinguished from daily increments.
Overpolishing has begun. Increments in the lower right corner have begun to disappear.
Further overpolishing. Increments in the lower right corner have disappeared, while those immediately above have split to the point where it is difficult to distinguish daily from subdaily increments.
Overpolishing has proceeded to the point where it is no longer possible to follow a complete growth sequence from otolith edge to the interior.