The Problem: Battery capacity cannot be measured as the drive battery never gets fully emptied during driving
The Mitsubishi Outlander PHEV is a very reliable car, but as the drive battery is never fully emptied, model years up to 2022 cannot measure actual battery capacity (model years 2023 and later use the Nissan/Renault EV platform that measures actual battery capacity, e.g. by continuous coulomb-counting combined with Open-Circuit Voltage resting curves and Kalman filtering).
Instead, the Battery Management Unit (BMU) has to estimate the real battery capacity based on the calendar ("secular degradation") and on charging cycles. Typically, this estimate is too pessimistic and therefore, the BMU does not allow full use of the real battery capacity. As a result, the EV gets unnecessarily reduced.
(The BMU never drains the battery below roughly 30% because it must reserve sufficient energy to spin up the cold combustion engine within a fraction of a second when EV power runs out. Unlike a traditional 12 V starter motor, which can take a few seconds to crank an engine in a stationary car, the PHEV's engine must engage instantaneously to prevent any loss of power while driving. And for that, the high-voltage starter motor needs some energy reserve in the drive battery. While a pure BEV can simply run its battery pack down to a halt, a PHEV must seamlessly hand over propulsion to the combustion engine the moment the empty battery threshold is reached.)
The Solution: Fully drain the battery while not driving and then measure the capacity
While the battery will never be fully emptied during driving, you can enforce this if the Outlander PHEV is stationary: a so-called Drive Battery Capacity Automatic Measurement (DBCAM) procedure can be triggered for a parked Outlander PHEV to force the BMU to measure the real battery capacity. The DBCAM procedure will then drain the battery to the low-voltage cutoff (which corresponds to maybe 20% of energy left in the battery, because going lower would put unnecessarily high stress on the drive battery). To this aim, DBCAM switches on air conditioning and heating simultaneously which is a good way to consume significant energy without actually driving. After that, DBCAM fully charges the battery and while charging, the BMU actually measures how much energy flows into the battery. This measured value then replaces the estimated battery capacity, giving you some range back.
Diagnostic tool needed to trigger the DBCAM procedure
You need a diagnostic tool to trigger the DBCAM procedure. This can be the original Mitsubishi Multi Use Tester (M.U.T.-III) or a third-party tool (that reverse-engineered the protocol used by the Mitsubishi M.U.T. via the OBD port on the CAN bus).
The remainder describes using the Thinkcar Thinkscan 689 diagnostic tablet to do this. While the diagnostic tablet needs to be bought once, it pays for itself compared to paying your car dealer every year or two for the DBCAM.
If you want to buy one of the Thinkcar tools: their web page is terrible -- links are not working and while their web page has a coverage or compatibility section where you should be able to see that the chosen Thinkcar tool supports DBCAM, these features of their website rarely work. But should you (or they) get their vehicle coverage inquiry web page to work, select Mitsubishi, OUTLANDER-PHEV, then your model year, Battery Management Unit (BMU), Special Functions, Battery Auto Capacity Measured: this needs to be supported by the tool that you buy.
I can confirm that the DBCAM procedure can be triggered with a Thinkcar Thinkscan 689; another tool that is confirmed to work is the Thinkdiag / Thinkdiag 2 tool.
Be aware that the cheaper Thinkcar tools are subscription-based: when you run them for the very first time, you have to register them and get the updates (=supported cars and functionalities) for the tool from that year. If the subscription expires, you can still continue using the tool -- you just will not get support for new car types, unless you opt for paying again for the subscription (it is OK to have gaps in the subscription and the subscription is cheaper if you buy an update only for a particular brand). Unless you are an independent repair shop that needs to service all brands, it is perfectly fine to buy a subscription-based diagnostic tool: it can do the DBCAM and forever supports everything that it supported when you activated it, i.e. you can do the DBCAM in all future years without a subscription.
I nevertheless opted for the Thinkscan 689 diagnostic tablet as this diagnostic tablet has lifetime updates and I did not understand at that time that the subscription model would have worked fine for me. But the cheaper Thinkdiag / Thinkdiag 2 tools should be perfectly fine.
The Thinkscan 689 diagnostic tablet is in fact an Android tablet with an OBD connector, whereas the Thinkdiag tool is an advanced OBD dongle that connects via Bluetooth to a Thinkcar app on your smartphone.
PHEV Watchdog app to read battery data
Also, I use the app PHEV Watchdog lite (together with an OBD Bluetooth adapter that I already had to clear DTC errors) to read, store, and present BMU data in an easier-to-use way than the diagnostic tablet does. See the screenshots below:
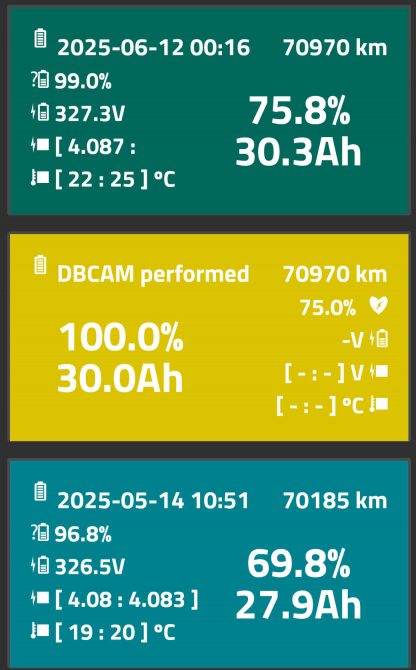
Before the DBCAM: 27.9 Ah usable battery capacity, corresponding to a 69.8% State of Health (SoH) of the battery. The DBCAM procedure itself (as initiated by the diagnostic tablet) found 30.0 Ah usable battery capacity corresponding to a 75.0% SoH (yellow tile) and stored that value in the BMU. After the battery had settled, even 30.3 Ah usable battery capacity corresponding to a 75.8% SoH is reported.
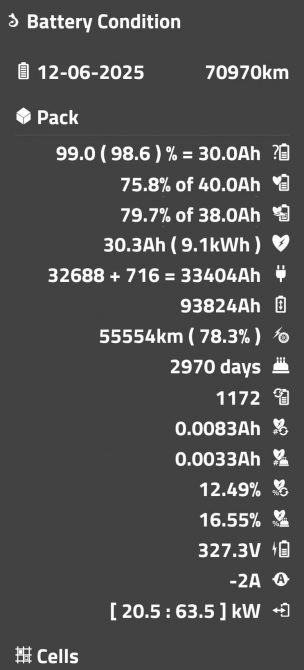
Details from PHEV Watchdog lite when reading BMU data after the DBCAM: 99.0%=30.0 Ah State of Charge (SoC). As Mitsubishi communicated for my 2017 model both a 40.0 Ah and a 38.0 Ah usable battery capacity when the PHEV leaves the factory, it is not clear which of these two values is correct, so the PHEV Watchdog lite app displays a SoH percentage for both maximum usable battery capacity values communicated by Mitsubishi. The absolute real usable battery capacity is 30.3 Ah or 9.1 kWh. 78.3% of the distance was driven electrically. The battery is 2970 days old and the charging corresponds to 1172 full charging cycles (but in practice, these were rarely full charging cycles, so that value is accumulated and calculated). 12.49% of the battery capacity was lost to charging ("cycle deterioration") and 16.55% of the battery capacity was lost to aging ("secular deterioration"), i.e. would have happened anyway regardless of how many charging cycles the car had.
Cell Smoothing
The improvement in usable battery capacity after a DBCAM comes from the BMU measuring actual capacity rather than relying on its pessimistic degradation formula. However, if individual cells are out of balance, then while charging the battery pack, one cell will inevitably reach the upper voltage limit during charging before the others are full. This leaves some of the pack's potential capacity untapped because lagging cells never get topped up.
PHEV Watchdog lite can show this cell drift. If the delta between the minimum and maximum voltage is ca. 0.050V or more on a fully charged, rested battery, doing what Mitsubishi calls Cell Voltage Smoothing before a DBCAM is well worth the extra step.
Why doesn't regular charging with balancing fix large cell drift?
The Outlander PHEV already performs cell balancing at the end of every AC charge using tiny resistors across each cell to ensure that all cells have the same voltage at the end of charging. This means: while the wall charger is pumping in several Amps, the tiny bleeder resistors draw away a fraction of the charging current so that the cells that have a rather high voltage get less charged than the cells that need to be topped up. But as even the "bleeding" cells still gain charge, these cells might still hit their maximum voltage limit and therefore, the car has to stop charging entirely, leaving the lagging cells undercharged.
In most cases, this cell balancing is sufficient to keep the cell drift well below the delta of 0.050V. But sometimes, cell smoothing is needed.
How Cell Smoothing fixes large cell drift
Cell Voltage Smoothing takes extra time and is therefore not done during normal charging, but needs to be initiated via diagnostic tools (such as the Thinkcar tablet) on a fully charged pack:
- The car is unplugged, meaning zero incoming charging current. The BMU switches on the bleed resistors only on the higher-voltage cells, slowly dissipating their excess energy as heat.
- Without an active charger hitting upper voltage limits, the BMU can run this targeted bleed uninterrupted (but it will stop after a maximum of 2 hours) until the high cells drop down to match the rest of the pack.
After this smoothing, the cells are set to the same voltage (which the normal cell balancing might not have achieved).
Starting the DBCAM with smoothly leveled cells ensures that every single cell fills to its true maximum and drains to its true cutoff together, allowing the BMU to register the highest possible Amp-hour capacity.
Procedure for cell smoothing
Note: I never tried it myself, though, as my own cell drift was only 0.010V, namely minimum cell 0.004V below average, maximum 0.006V above, which is well within normal tolerance, so I skipped smoothing and the following text is not based on my experience, but AI-generated:
Connect: Plug your Thinkcar diagnostic tablet into the OBD port while the vehicle is fully OFF.
Ignition to READY: Turn the vehicle on to READY mode (foot on the brake, press power). (Note: This is different from DBCAM, which requires the vehicle to be turned fully OFF for the discharge and charging phases to begin.)
Navigate: Open the Thinkcar app, decode your VIN, and navigate to System Selection -> BMU.
Execute: Select Special Function -> Cell voltage smoothing.
Confirm: Press the button to execute the command.
Monitor: The Thinkcar screen will show an "Execution status." You simply wait until that status changes from "Active" to "Not Active" to confirm the balancing is completely finished.
Time: The process can take up to a maximum of 2 hours to complete.
Tablet Power: Your Thinkcar tablet must not go to sleep or turn off its screen during this process. If it does, the connection will drop, and the procedure will abort and throw an error. Plug your tablet into a charger and set its display settings to stay awake indefinitely.
DBCA procudure step-by-step
You may find on the web a Mitsubishi Service Bulletin MSB-17EXL54-501 (to avoid any copyright claim, I do not provide the link here, but you should be able to find it via a search engine, the filename is: MSB-17EXL54-501.pdf). This document describes the official procedure using the Mitsubishi M.U.T.-III diagnostic tablet. The following is for the Thinkcar tools based on this official procedure and on the forum post listing the steps for the Thinkdiag / Thinkdiag 2.
If you like, first use the PHEV Watchdog lite app in order to take a new reading of the current battery condition there (connect via Bluetooth to your generic OBD dongle, then via three dots: Battery Condition -- when connected via Bluetooth, it should immediately record a new reading. By tapping on it, you can delete a reading in case you made too many recordings of the same state).
But now, the steps to trigger the DBCAM procedure with the Thinkcar tools:
- Drive the drive battery to empty (because DBCAM will measure how much energy it can charge into an empty battery -- but when the car displays the battery as empty, it still has 30% of energy stored and this 30% buffer will be emptied as part of the DBCAM)
- Have car switched off
- Connect charging cable: car will start charging (even though we want to have the battery empty: as it is slow AC charging anyway, it is no problem that this starts charging the car now)
- Connect the diagnostic tablet (IIRC I had the car switched on, but in step 17, I later had to switch my car off for the DBCAM to start: try next time to leave it switched off! The Mitsubishi Service Bulletin MSB-17EXL54-501 also mentions that the car should be switched off before connecting their diagnostic tablet.)
- Do the VIN scan: click the large VIN button
- Click: Automatically Search. It will then show Vehicle information, click: OK
- Click: System Selection
- Scroll down to and click: BMU
- Scroll down to and click: Special Function
- Scroll down to and click: Battery Auto Capacity Measured, confirm with: Yes
- As DBCAM is currently not running, but may have completed an earlier run, Execution Status should be either: Not run (if you never did a DBCAM) or Complete (from the previous DBCAM)
- Scroll down: Auto Capa.Measured Result HIS.1 to 10 should show the history of previous DBCAM battery capacity measurements (or the original capacity, 40 in case of my MY 2017) and Auto Capa.Measured ODO HIS. 1 to 10 should show the odometer readings from previous DBCAMs, or 0.
- You may want to note down what value is shown for Battery Current Capacity -- after DBCAM has completed, it should have changed and will hopefully be a higher number as it is using the measured instead of the too pessimistic value calculated by the BMU.
- At the very bottom of the list, Capa. Measured Discharge Current should show NG/Not Performed
- At the bottom right, click: Perform (to start the DBCAM) and confirm with: yes. It should then say: Successful Operation, press: OK
- Execution Status should now be: Executing
- As I still had my car switched on, at the very bottom of the list, Capa. Measured Discharge Current was still showing: NG/Not Performed
- Finally, after switching off my car, the cabin fan, AC, and heater kicked on at full blast (activating high-draw consumers to discharge the pack below 30%). The diagnostic tablet was still running, and at the very bottom of the list, Capa. Measured Discharge Current was now showing: Ok
- As the car was in my garage, I did not lock it, but it should be possible to lock the car now if you do this outdoors.
You now hear the fan and heater running to drain the battery: this means success. Emptying the drive battery to 0% will now take some hours (approx. 1-2 h). All documentation says that it is now possible to disconnect the diagnostic tablet (and reconnect later to check).
I left the diagnostic tablet connected, but after some time, the car put the OBD port to sleep anyway, so the diagnostic tablet disconnected. I left my car in my garage, i.e. I did not lock the car doors.
Sooner or later, the battery is empty and the fan, AC, etc. should go off. The car should now have automatically started a new charging session, i.e. charging the empty battery (and while doing that, it will measure how much it is able to charge the battery to determine the real capacity): the red charging symbol on the dashboard should be on then.
While it was charging, I reconnected my diagnostic tablet to the car:
- I did the above VIN scan, but when selecting: Automatically Search, it returned an error and I had to manually enter the VIN (even though it had just displayed the VIN a few seconds before).
- After that, I was able to select: System selection
- BMU
- Special Function
- Battery Auto Capacity Measured
- Execution Status should still show: Executing
- Capa. Measured Discharge Current should show again: NG/Not Performed
When this measured charging session finished (which will take longer than a normal charge that would start at ca. 30%, as this time the charge starts with a lower SoC), the red charge light on the dashboard should go off.
I then connected the diagnostic tablet again and switched on the car.
I still had the charging cable connected and interestingly the 12 V battery light was on, i.e. the DC-DC converter was not charging the 12 V battery, but the car was in accessory mode (I am pretty sure that I had pressed the brake pedal while switching the car on, but I might be wrong). I then switched the car off, disconnected the charging cable, and then switched the car on: the 12 V light was gone.
- I did the usual VIN scan, and Automatically Search worked again this time.
- After that, I was able to select: System selection
- BMU
- Special Function
- Battery Auto Capacity Measured
- Execution Status should be: Complete
- Error status should still be: No error
- Capa. Measured Discharge Current should show again: NG/Not Performed
- Battery Current Capacity should show a new value (hopefully higher than the old value that you noted down).
- Also, the HIS.1 value should have been shifted to HIS.2 and so on.
The DBCAM is now finished and you can disconnect the diagnostic tablet. If you like, connect PHEV Watchdog lite. It should say that a new capacity measurement is available and via Battery Condition, the yellow tile for the DBCAM event (see screenshot at top) should be shown and the tile with the new (hopefully better) capacity should be shown.
If you do the DBCAM for the very first time, you may get a significant amount of range back. If you do the DBCAM yearly after that, the yearly gain will of course not be that large (but still worth it and while the history has space for 10 DBCAM results, you can do more than 10 DBCAMs: the older results then just get shifted out of the history).
TPMS Valve Programming
In case the TPMS sensors need to be exchanged: Thinkcar also has a device for reading TPMS sensors, transferring that via Bluetooth to the diagnostic tablet and then writing the valve ID via the diagnostic tablet to the Outlander's OBD port. For cloning an ID of an existing valve (i.e. writing an ID to a new valve), that will only work with Thinkcar valves (that you can buy). However, the Thinkcar TPMS tools should be able to read (and then write to the Outlander) almost all OEM and aftermarket 315 MHz / 433 MHz sensors, e.g. even the original Mitsubishi ones.