The iKoolCore R2 is a mini PC available with Intel N95 CPU/SoC with 8 GB RAM or with N300 CPU/SoC with 16 GB RAM. These Intel 12th generation of Intel Core processors Alder Lake N CPUs/System-On-a-Chip allow fanless designs (because they consist of the efficiency cores of Alder Lake only) -- however the iKOOLCORE R2 in fact has a fan (probably, the case is too tiny to dissipate the heat).
The Intel Alder Lake N series CPUs/SoCs support both DDR4 and DDR5 RAM and the iKOOLCORE R2 has LPDDR5 RAM soldered on, i.e. you cannot expand the maximum 16 GB that you can order. (While Intel specifies 16 GB RAM as maximum, reports validate that they work with 32 GB and 48 GB).
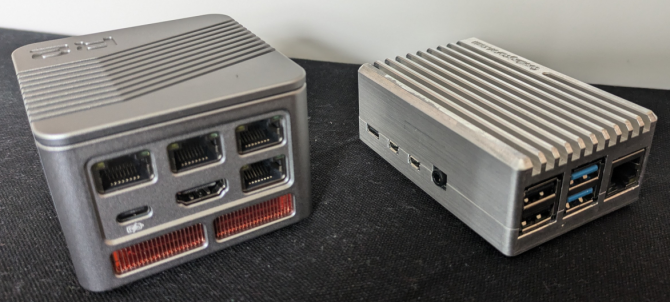
Size comparison of the iKOOLCORE R2 and a Raspberry Pi 4 in a passive cooling case.
There are now two larger variants available on the iKoolCore web page: R2 POE (Fanless PoE Firewall) and R2 Max (with 10Gbps NICs that you can get without a fan, but this makes only sense for the N100 variant as the N305 variant would run into thermal throttling).
Note that while the used Intel Ethernet Intel i226 chips have a good driver support in Linux and BSD, there are however claims that these chips crash/hang after a couple of hours and the only way to prevent this is to switch of PCIe power saving (ASPM) -- on the other hand, you find people reporting their N100 systems with i226 running rock-solid.
The R2 has a second M.2 port keyed for WiFi and you can order a WiFi 6E card that is well supported by Linux (works out of the box with Ubuntu, IIRC also with some Debian live). According to lspci, I got a 01:00.0 Network controller: MEDIATEK Corp. MT7922 802.11ax PCI Express Wireless Network Adapter and also dmesg says:
[    6.034657] mt7921e 0000:01:00.0: firmware: direct-loading firmware mediatek/WIFI_MT7922_patch_mcu_1_1_hdr.bin

[    6.034673] mt7921e 0000:01:00.0: HW/SW Version: 0x8a108a10, Build Time: 20221227123154a
[ 6.433246] mt7921e 0000:01:00.0: firmware: direct-loading firmware mediatek/WIFI_RAM_CODE_MT7922_1.bin
[ 6.433262] mt7921e 0000:01:00.0: WM Firmware Version: ____000000, Build Time: 20221227123243
[ 6.477101] mt7921e 0000:01:00.0: firmware: direct-loading firmware mediatek/WIFI_RAM_CODE_MT7922_1.bin
[ 7.564873] mt7921e 0000:01:00.0 wlp1s0: renamed from wlan0
The only disadvantage is the Chinese origin. Better would be the ODROID H4 from Hardkernel which is South-Korean -- however it does not come in such a nice case.
Temperatures
The iKOOLCORE R2 has a fan (I prefer fanless, though). But when in BIOS, I do not hear the fan at all (in fact, I thought it was not running, but when my ear touches the case, I can hear that it is rotating). Still, this is of course a mechanical, moving part that can fail. Also an idle Ubuntu leads to 35°C to 37°C core temperature and other sensors (temp1) show 48°C and makes the fan spin slightly and audible. Using the stress command, I have seen CPU temperatures between 60°C and 68°C and then, the fan becomes louder. The BIOS also allows to set some thermal limits which might keep fan noise on the lower limit. The NVMe SSD is not cooled by the fan, only via some thermal glue pad to the metal case and reaches 41°C in idle (while the CPUs are 35°C to 37°C) as reported by the psensor reading called Composite (nvme-pci-0300). The Wifi card is neither cooled by the fan nor attached to the metal case, hence it reaches 46°C as reported by the psensor reading called temp1 (mt791_phy0-pci-0100). Note that there is also another sensor named temp1 (acpitz-acpi-0) which is some ACPI thermal zone, but I do not know to what hardware item that refers, but that temperature is typically coolest, e.g. 28°C.
Note that the BIOS had set the maximum temperature to 95°C (from the default 105°C) and i kept it like that. In addition, I adjusted this also on the Platform level via: Advanced, Thermal Configuration, Platform Thermal Configuration, Critical Trip Point set to: 95 C (the system will be shut down at that temperature). Probably, even 100°C would be OK. TODO: read new info on their wiki.
Power consumption
Note that the power in connector is USB C style and I validated that a 65 W USB C PD supply can power it (a 30 W supply was not sufficient: the refer in their wiki also to 65 W USB C PD.). However, the R2 comes with its own power supply (and even a USB C to barrel style adapter in case you want to use another power supply). But be warned: while the R2 comes with a 12 V 4 A power supply that has a USB C connector, it does probably not negotiate voltages in a USB C PD style, i.e. this power supply probably always puts 12 V on the USB C connector and therefore can fry any device that cannot handle 12 V. (BTW: Also the analogue audio uses a port that is mechanically USB C-style, but seems to be purely analog and does not use the digital USB protocol -- probably it does even matter whether the USB C to analogue adapter is 180° swapped or not, whereas USB C is supposed to be agnostic to that. But such an adapter is anyway not shipped together with the R2.)
Some first power measurement: when the system is just plugged in, but switched off, it already consumes 1.6 W. When it is idle in BIOS, it consumes 10.6 W (14.75 V, 0.72 A) when powered by USB C PD (measured with a cheap USB C multimeter).
Idle Ubuntu 24.04 live, just desktop running: 9.0 W.
(An N200-based system is reported to have 5-6 W idle power consumption -- but with 2 Ethernet ports instead of 4, maybe this matters.)
Using command stress:
Stress 1 core: 18.3 W
Stress 2 cores: 25.3 W
Stress 3 cores: 29.2 W
Stress 4 cores: 29.3 W
Stress 5 cores: 27.6 W
Stress 6 cores: 27.9 W
Stress 7 cores: 27.3 W
Stress 8 cores: 26.8 W
We see that once more than 4 cores are used, the power consumption gets restricted (I observed something similar with the Intel J4105). Note that the TDP of the N300 CPU is 7 W, i.e. we see that TDP is not the the maximum power consumption -- rather the idle power consumption (at base frequency -- therefore now rather called PBP: Processor Base Power) is already the TDP).
My Raspberry Pi and Intel J4105 measurements show that these systems consume much lower power in idle than this N300 system, namely only 3.8 W. But reviews of other Alder Lake N system show that idle power consumption in the 3-4 W range is possible as well -- I did not check many BIOS settings that influence power consumption.
Update: 2/2025: Intel has now Alder Lake successors: Twin Lake that are slightly faster.
ECC RAM
The nice thing with this machine is the ECC RAM: DDR5 RAM is so dense that errors are likely to occur and therefore, all DDR5 RAM has on-die ECC -- but this is transparent to the CPU/SoC so that ECC errors are not reported to the OS and also the transmission over the data bus itself is not ECC protected. According to the memtest86 documentation, there is also some Link ECC to protect the LPDDR5 transmission channels.
But in addition, these SoCs support In-Band ECC (IBECC). But the BIOS needs to be configured by the vendor to allow enabling: It is document that this is the case with LattePanda Mu and ODROID H4.
The great news is that the iKOOLCORE R2 BIOS supports IBECC as well in its BIOS (already the BIOS version 1.0.0).
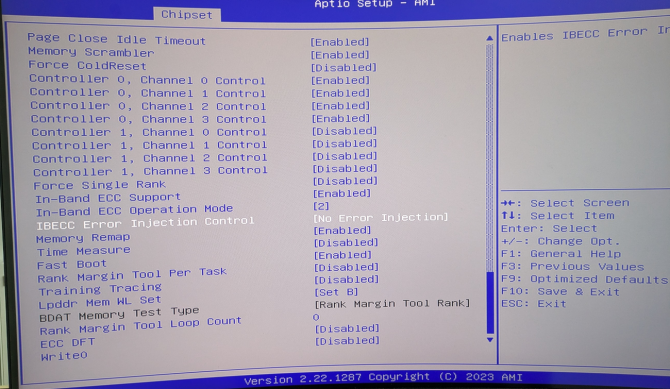
BIOS setting for enabling In-band ECC (IBECC) -- You can reach it via: Chipset, System Agent (SA) Configuration, Memory Configuration, then scroll down and enable In-Band ECC Support and set In-Band ECC Operation mode to 2
(I have another post as a reminder that even if the BIOS does not support enabling IBECC, there are claims that using the AMISCE tool from AMI, you might be able to set this from command line.)
While traditional Off-Band ECC would use extra bits on the data bus and in the RAM to provide ECC, In-Band ECC (IBECC) means that part of the normal RAM is used for ECC and also part of the normal data bus, i.e. slowing down data transfers (in comparison to traditional ECC) and reducing the amount of usable RAM. But the big advantage over the DDR5 on-die ECC is that the ECC-protection applies also to transmission of data over the data bus and that the OS can report ECC errors, so that you get informed about rotting RAM.
(I guess, if IBECC is used together with DDR5 on-die ECC that corrects silently single bit errors, these get never detected as single bit errors are not really considered to be a sign of failing RAM but anticipated as normal due to the high-density and get therefore never reported by the IBECC -- but the two bit errors probably cannot get corrected by the on-die ECC and should get reported by the IBECC?).
The overhead of IBECC is that for every 512 bits, 16 bits of the normal RAM are used for IBECC (compared to 64 + 8 for the traditional ECC and 128 + 8 for the DDR5 on-die ECC), i.e. the available amount of RAM is reduced by 1/32 and the performance penalty is ca. 10-20 %, depending on the workload with on-chip GPU-centric workload suffering most.
It would be interesting to test the error correction of the IBECC: for this, the BIOS has an IBECC Error Injection setting that seems to allow to inject errors in order to check the IBECC functionality. However this BIOS setting is only briefly documented and I need to play around with it. But it seems that Inject Uncorrectedable Error on insertation counter allows to set some insertion count ("Number of transactions between ECC error injection") -- in contrast to Inject Correctable Error Address match where an error injection address match and an error injection mask need to be set (seems that if the mask is written to that address, this will lead to an ECC error: "This register defines the count of write chunks (64-bit data packets) until the next ECC error injection in case ECC_inject field in ECC_DFT_config is 110 or 111. The count is of chunks in order to allow creating ECC errors on different 64-bit chunks"
Also another related BIOS setting is not well documented: ECC DFT -- it seems that this is related to the error injection, i.e. needs to be enabled for testing, see page 258 of the Intel® Xeon® Processor E3-1200 v3 Product Family Datasheet – Volume 2 of 2.
Checking ECC support with Linux
Linux supports IBECC via Intel's IGEN6 module starting from version 2.5.1 that has been integrated in kernel version 5.11 . Update: but Alder Lake N is only supported with kernel 6.8.x and later.
Debian Bookworm with kernel 6.1.x: no success
I first tried the Debian Bookworm live CD, where I needed first to do: modprobe igen6_edac
To see that ECC is enabled, the dmidecode and edac-utils Linux commands can be used.
On the Debian Bookworm live CD, I needed to install package: edac-utils which added the module with success (showing up as EDAC MC: Ver: 3.0.0 and EDAC igen6: v2.5.1 in dmesg-- but running edac-util --status gives only
EDAC drivers loaded. No memory controllers found
and dmidecode -t memory gives
Error Correction Type: None
Update: it seems that at least kernel 6.8 is needed for ECC support on Alder Lake N (but Bookworm has kernel 6.1.x only).
Note for future: edac-tools might get in future replaced by rasdaeomon.
Ubuntu 24.04 with kernel 6.8.x: success
Now trying Ubuntu 24.04 that has a 6.8.0 kernel:
Kernel module igen6_edac is loaded automatically.
dmesg shows now more:
[    0.477944] EDAC MC: Ver: 3.0.0

[   31.147165] caller igen6_probe+0x1c9/0x610 [igen6_edac] mapping multiple BARs

[   31.153497] EDAC MC0: Giving out device to module igen6_edac controller Intel_client_SoC MC#0: DEV 0000:00:00.0 (INTERRUPT)

[   31.153840] EDAC igen6: v2.5.1
Also with Ubuntu, I needed to install package: edac-utils, but now running edac-util --status gives finally
EDAC drivers are loaded. 1 MC detected
edac-util -v gives now
mc0: 0 Uncorrected Errors with no DIMM info
mc0: 0 Corrected Errors with no DIMM info
edac-util: No errors to report.
Now, dmidecode -t memory gives
# dmidecode 3.5

Getting SMBIOS data from sysfs.

SMBIOS 3.5.0 present.
Handle 0x0027, DMI type 16, 23 bytes
Physical Memory Array
Location: System Board Or Motherboard
Use: System Memory
Error Correction Type: None
Maximum Capacity: 48 GB
Error Information Handle: Not Provided
Number Of Devices: 8
Handle 0x0028, DMI type 17, 92 bytes
Memory Device
Array Handle: 0x0027
Error Information Handle: Not Provided
Total Width: 16 bits
Data Width: 16 bits
Size: 4 GB
Form Factor: Row Of Chips
Set: None
Locator: Controller0-ChannelA
Bank Locator: BANK 0
Type: LPDDR5
Type Detail: Synchronous
Speed: 6400 MT/s
Manufacturer: Samsung
Serial Number: 20000000
Asset Tag: 9876543210
Part Number:
Rank: 2
Configured Memory Speed: 4800 MT/s
Minimum Voltage: 0.5 V
Maximum Voltage: 0.5 V
Configured Voltage: 0.5 V
Memory Technology: DRAM
Memory Operating Mode Capability: Volatile memory
Firmware Version: Not Specified
Module Manufacturer ID: Bank 1, Hex 0xCE
Module Product ID: Unknown
Memory Subsystem Controller Manufacturer ID: Unknown
Memory Subsystem Controller Product ID: Unknown
Non-Volatile Size: None
Volatile Size: 4 GB
Cache Size: None
Logical Size: None
Handle 0x0029, DMI type 17, 92 bytes
Memory Device
Array Handle: 0x0027
Error Information Handle: Not Provided
Total Width: 16 bits
Data Width: 16 bits
Size: 4 GB
Form Factor: Row Of Chips
Set: None
Locator: Controller0-ChannelB
Bank Locator: BANK 1
Type: LPDDR5
Type Detail: Synchronous
Speed: 6400 MT/s
Manufacturer: Samsung
Serial Number: 20000000
Asset Tag: 9876543210
Part Number:
Rank: 2
Configured Memory Speed: 4800 MT/s
Minimum Voltage: 0.5 V
Maximum Voltage: 0.5 V
Configured Voltage: 0.5 V
Memory Technology: DRAM
Memory Operating Mode Capability: Volatile memory
Firmware Version: Not Specified
Module Manufacturer ID: Bank 1, Hex 0xCE
Module Product ID: Unknown
Memory Subsystem Controller Manufacturer ID: Unknown
Memory Subsystem Controller Product ID: Unknown
Non-Volatile Size: None
Volatile Size: 4 GB
Cache Size: None
Logical Size: None
Handle 0x002A, DMI type 17, 92 bytes
Memory Device
Array Handle: 0x0027
Error Information Handle: Not Provided
Total Width: 16 bits
Data Width: 16 bits
Size: 4 GB
Form Factor: Row Of Chips
Set: None
Locator: Controller0-ChannelC
Bank Locator: BANK 2
Type: LPDDR5
Type Detail: Synchronous
Speed: 6400 MT/s
Manufacturer: Samsung
Serial Number: 20000000
Asset Tag: 9876543210
Part Number:
Rank: 2
Configured Memory Speed: 4800 MT/s
Minimum Voltage: 0.5 V
Maximum Voltage: 0.5 V
Configured Voltage: 0.5 V
Memory Technology: DRAM
Memory Operating Mode Capability: Volatile memory
Firmware Version: Not Specified
Module Manufacturer ID: Bank 1, Hex 0xCE
Module Product ID: Unknown
Memory Subsystem Controller Manufacturer ID: Unknown
Memory Subsystem Controller Product ID: Unknown
Non-Volatile Size: None
Volatile Size: 4 GB
Cache Size: None
Logical Size: None
Handle 0x002B, DMI type 17, 92 bytes
Memory Device
Array Handle: 0x0027
Error Information Handle: Not Provided
Total Width: 16 bits
Data Width: 16 bits
Size: 4 GB
Form Factor: Row Of Chips
Set: None
Locator: Controller0-ChannelD
Bank Locator: BANK 3
Type: LPDDR5
Type Detail: Synchronous
Speed: 6400 MT/s
Manufacturer: Samsung
Serial Number: 20000000
Asset Tag: 9876543210
Part Number:
Rank: 2
Configured Memory Speed: 4800 MT/s
Minimum Voltage: 0.5 V
Maximum Voltage: 0.5 V
Configured Voltage: 0.5 V
Memory Technology: DRAM
Memory Operating Mode Capability: Volatile memory
Firmware Version: Not Specified
Module Manufacturer ID: Bank 1, Hex 0xCE
Module Product ID: Unknown
Memory Subsystem Controller Manufacturer ID: Unknown
Memory Subsystem Controller Product ID: Unknown
Non-Volatile Size: None
Volatile Size: 4 GB
Cache Size: None
Logical Size: None
Handle 0x002C, DMI type 17, 92 bytes
Memory Device
Array Handle: 0x0027
Error Information Handle: Not Provided
Total Width: Unknown
Data Width: Unknown
Size: No Module Installed
Form Factor: Unknown
Set: None
Locator: Controller1-ChannelA-DIMM0
Bank Locator: BANK 0
Type: Unknown
Type Detail: None
Handle 0x002D, DMI type 17, 92 bytes
Memory Device
Array Handle: 0x0027
Error Information Handle: Not Provided
Total Width: Unknown
Data Width: Unknown
Size: No Module Installed
Form Factor: Unknown
Set: None
Locator: Controller1-ChannelB-DIMM0
Bank Locator: BANK 1
Type: Unknown
Type Detail: None
Handle 0x002E, DMI type 17, 92 bytes
Memory Device
Array Handle: 0x0027
Error Information Handle: Not Provided
Total Width: Unknown
Data Width: Unknown
Size: No Module Installed
Form Factor: Unknown
Set: None
Locator: Controller1-ChannelC-DIMM0
Bank Locator: BANK 2
Type: Unknown
Type Detail: None
Handle 0x002F, DMI type 17, 92 bytes
Memory Device
Array Handle: 0x0027
Error Information Handle: Not Provided
Total Width: Unknown
Data Width: Unknown
Size: No Module Installed
Form Factor: Unknown
Set: None
Locator: Controller1-ChannelD-DIMM0
Bank Locator: BANK 3
Type: Unknown
Type Detail: None
I think, the first entry (Physical Memory Array) is about the maximum possible RAM that the BIOS supports (48 GB would fit other claims about 48 GB maximum supported by Alder Lake N). The next four entries (Memory Device) are for the LPDDR5 RAM with four memory channels Locator: Controller0-ChannelA to Locator: Controller0-ChannelD: 4 times 4 GB correspond to the installed 16 GB of LPDDR5 RAM: there, the error correction does not say None, but rather: Not Provided (which is maybe better than None).
The total RAM should get reduced, and indeed, I get:
root@ubuntu:~# free

               total        used        free      shared  buff/cache   available

Mem:        15577452     2116020     5654132      237940     8350312    13461432

Swap:              0           0           0

root@ubuntu:~# free -h

               total        used        free      shared  buff/cache   available

Mem:            14Gi       2.0Gi       5.4Gi       232Mi       8.0Gi        12Gi

Swap:             0B          0B          0B
whereas with IBECC switched off in the BIOS, I get:
rootu@ubuntu:~$ free

               total        used        free      shared  buff/cache   available

Mem:        16093552     2142904     6576996      688656     8360572    13950648

Swap:              0           0           0

root@ubuntu:~$ free -h

               total        used        free      shared  buff/cache   available

Mem:            15Gi       2.0Gi       6.3Gi       660Mi       8.0Gi        13Gi

Swap:             0B          0B          0B
The difference in total RAM is ca. 1 GB: based on the above 1/32 of the RAM being used for ECC, I would expect 15590628.5 bytes of total RAM being displayed, but there are no half bytes and probably some other rounding takes place (the difference of the displayed 15577452 bytes to the theoretical value is 13176.5 bytes, i.e. less than 12 KB).
This is all an indicator that IBECC works (at least with Linux kernel 6.8 and later). But the ultimate test would be to inject a RAM error, either via BIOS settings or via the ROWHAMMER attack (however, due to the on-die ECC of DDR5 RAM, single bit ROWHAMMER changes might get silently corrected and the BIOS has even a ROWHAMMER mitigation setting that is enabled by default).
Further details from reviews
- ServeTheHome: be aware that only three of the four Ethernet ports are PCIe-connected Intel i226-V chips, the fourth one is a Realtek RTL8156BG chip connected via USB.
- Liliputing: Analogue audio port not working, Wifi not working on 2.5 GHz, but on 5 GHz. UPDATE: Wifi at 2.4 GHz works for me. The M.2 NVMe port has only two PCIe lanes, i.e. PCIe Gen 3 x2
- CNX Software part 1 / part 2: Getting video passthrough of a VM guest on the video ports might be a challenge when using Proxmox VE as host, but it is do-able with some fiddling around.
Wiki
The OEM even has a Wiki with, e.g. future BIOS updates or the order of the Ethernet ports from left to right: Upper board: eth1 | eth2 | eth3 (RTL8156BG), Lower board: eth0. NOTE: eth0, eth1, and eth2 are all Intel i226-V network cards. Note: this info is wrong: the Realtek is on the upper left!
Issues
Somehow, I had to unplug and re-plug my 25 year old Logitech USB keyboard to get it recognised: it worked for the BIOS, but then when the Linux installer (both Debian and Ubuntu) showed GRUB, I had to replug the keyboard to get it work. With my as old IBM USB keyboard, this problem did not occur.
My as old Samsung monitor that has no HDMI, but a DVI input did not work when using an HDMI to DVI adapter: the screen went black (but did not show: no signal).
I had problems getting the networking (both Ethernet and WiFi) running with the Debian 12 netinstaller, but the live image works as well as Ubuntu works. The Mediatek RZ608 WiFi shows up as wlp1s0, but does not work (neither Debian installed nor Ubuntu live -- even though IIRC I had it running in with some live Linux in the past).
ip link show says:
6: wlp1s0:  mtu 1500 qdisc noqueue state DOWN mode DORMANT group default qlen 1000

    link/ether d6:XX:XX:XX:XX:6e brd ff:ff:ff:ff:ff:ff permaddr cc:XX:XX:XX:XX:86
It is probably the non-existing killswitch (to disable WiFi via hardware switch):
journalctl -b -g "mt7921e*" gives:
Sep 27 11:41:18 r2 NetworkManager[748]: [1727437278.7479] rfkill1: found Wi-Fi radio killswitch (at /sys/devices/pci0000:00/0000:00:1c.0/0000:01:00.0/iee>
journalctl -b -g "kill" gives:
Sep 27 11:41:17 r2 systemd[1]: Listening on systemd-rfkill.socket - Load/Save RF Kill Switch Status /dev/rfkill Watch.

Sep 27 11:41:17 r2 systemd[1]: Starting systemd-rfkill.service - Load/Save RF Kill Switch Status...

Sep 27 11:41:17 r2 systemd[1]: Started systemd-rfkill.service - Load/Save RF Kill Switch Status.

Sep 27 11:41:17 r2 NetworkManager[748]:   [1727437277.9875] manager[0x55bf9d587000]: rfkill: Wi-Fi hardware radio set enabled

Sep 27 11:41:17 r2 NetworkManager[748]:   [1727437277.9875] manager[0x55bf9d587000]: rfkill: WWAN hardware radio set enabled

Sep 27 11:41:18 r2 NetworkManager[748]:   [1727437278.0005] manager: rfkill: Wi-Fi enabled by radio killswitch; enabled by state file

Sep 27 11:41:18 r2 NetworkManager[748]:   [1727437278.0005] manager: rfkill: WWAN enabled by radio killswitch; enabled by state file

Sep 27 11:41:18 r2 NetworkManager[748]:   [1727437278.7479] rfkill1: found Wi-Fi radio killswitch (at /sys/devices/pci0000:00/0000:00:1c.0/0000:01:00.>

Sep 27 11:41:23 r2 systemd[1]: systemd-rfkill.service: Deactivated successfully.

Sep 27 11:43:31 r2 NetworkManager[748]:   [1727437411.9965] manager: rfkill: Wi-Fi hardware radio set disabled

Sep 27 11:43:31 r2 wpa_supplicant[751]: rfkill: WLAN soft blocked

Sep 27 11:43:32 r2 NetworkManager[748]:   [1727437412.0126] manager: rfkill: Wi-Fi now disabled by radio killswitch

Sep 27 11:43:32 r2 systemd[1]: Starting systemd-rfkill.service - Load/Save RF Kill Switch Status...

Sep 27 11:43:32 r2 NetworkManager[748]:   [1727437412.0440] manager: rfkill: WWAN hardware radio set disabled

Sep 27 11:43:32 r2 systemd[1]: Started systemd-rfkill.service - Load/Save RF Kill Switch Status.

Sep 27 11:43:32 r2 NetworkManager[748]:   [1727437412.6875] manager: rfkill: Wi-Fi hardware radio set enabled

Sep 27 11:43:32 r2 NetworkManager[748]:   [1727437412.7764] manager: rfkill: Wi-Fi now enabled by radio killswitch

Sep 27 11:43:32 r2 NetworkManager[748]:   [1727437412.7864] manager: rfkill: WWAN hardware radio set enabled

Sep 27 11:43:37 r2 systemd[1]: systemd-rfkill.service: Deactivated successfully.
The interesting thing is that looking at the above /sys/devices/..., neither the hard nor the soft killswitch is enabled.
I also tried disabling the systemd-rfkill.service via a kernel boot option, but that did not solve the problem.
nmcli radio wifi off

nmcli radio wifi on
did neither work.
Then I plugged in an external USB WiFi stick and then suddenly, the built-in WiFi starts to work.
For reference: the lower right Ethernet port is enp2s0 (in my system, the MAC address ending with 4C), the upper right Ethernet port is enp4s0, the upper centre Ethernet port is enp5s0, and the upper left seems to be the one that is the Realtek USB one (showing up as enx00followed by MAC address being port of the device name). The enp numbers refer to the PCIe lanes, see also lspci:
01:00.0 Network controller: MEDIATEK Corp. MT7922 802.11ax PCI Express Wireless Network Adapter

02:00.0 Ethernet controller: Intel Corporation Ethernet Controller I226-V (rev 04)

04:00.0 Ethernet controller: Intel Corporation Ethernet Controller I226-V (rev 04)

05:00.0 Ethernet controller: Intel Corporation Ethernet Controller I226-V (rev 04)